I recently wanted to take a hierarchy of items and draw them in a nice tree structure. For example, a Family Tree.
At the time, I thought “This will be easy, I’ll just Google for an algorithm to determine the X,Y position of each node, then do something to draw each node on the screen”.
But it turns out Googling for a simple and easy-to-follow algorithm for drawing nice trees is very hard.
My initial Google attempts lead me to the Reingold-Tilford Algorithm.
This sounded exactly like what I wanted, however I was having a lot of trouble in understanding the algorithm so I could convert it into my language of choice (C#). Every article I found seemed to be written for a much smarter person than myself, and I had some difficulty following what they were doing and converting the logic to C#.
After much time spent going through research papers and browsing sample code, I think I finally understand it. So here’s my attempt at explaining the algorithm for drawing trees in an aesthetically pleasing way, using simple terms.
The Example
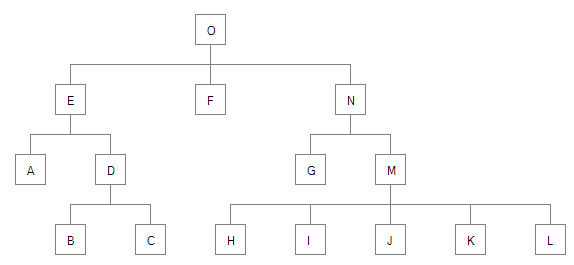
I’m going to use the example tree from a 1991 journal article by Dr. Dobbs. I found this article the easiest to understand and work my way through, and it would probably be worthwhile to read it if you’re looking into drawing nice trees for yourself. It also contains some more details about what is considered an “aesthetically pleasing tree”, which I won’t talk about in detail because its easy to find online if needed.
The sample tree from the article that I will be using looks like this:
Introduction to The Algorithm
Determining the Y position of each node is easy, so I’m not going to go into detail about it here. The main trouble is determining an appropriate X position for each node.
Here is a very brief overview of the logic I used to determine an appropriate X position of each node. You could probably just take this and figure out how to get the X,Y values yourself in whatever language you want, or I’ll go into each step in more detail later.
- Do a post-order traversal of the tree
- Assign an X value to each node of 0 if it’s a left-most node, or leftSibling.X + 1 if it’s not.
-
For each parent node, we want the node centered over the children. This would be the midway point between the first child’s X position, and the last child’s X position.
If the parent has no left sibling, change it’s X value to this midpoint value. If it has a left sibling, we’re going to store it in another node property. I’m calling this property Mod just because that’s what I see it called in other examples.
The Mod property is used to determine how much to modify the children’s X values in order to center them under the parent node, and will be used when we’re done with all our calculates to determine the final X value of each node. It should actually be set to Parent.X – MiddleOfChildrenX to determine the correct amount to shift the children by.
- Check that this tree does not conflict with any of the previous sibling trees, and adjust the Mod property if needed. This means looping through each Y level in the current node, and checking that the right-most X value of any sibling to the left of the node does not cross the left-most X value of any child in the current node.
- Do a second walk through the tree to determine that no children will be drawn off-screen, and adjust the Mod property if needed. This can happen when if the Mod property is negative.
- Do a third walk through the tree to determine the final X values for each node. This will be the X of the node, plus the sum of all the Mod values of all parent nodes to that node.
Now lets go through each step in more detail.
First Traversal of Tree
We’re going to do a pre-order traversal of the tree for the first walk through, meaning we draw the tree from the bottom up, going from left to right. See the initial drawing of the tree? The nodes have letters on them, A through O. This is the order which the post-order traversal will process the nodes.
This iteration of the tree can be broken up into 3 steps:
- Assign an X value to each node of
leftSibling.X + 1, or0if no leftSibling - Move child nodes under parent node
- Verify no children conflict with other trees
Assigning initial X values
The first step is to calculate a “local X” value value for each node. This is the X value within that set of children only.
So the X value of each node after this step would look like this:

The code I use for this is as follows
private void CalculateInitialX(TreeNode node)
{
    foreach (var child in node.Children)
        CalculateInitialX(child);

    // if there is a previous sibling in this set,
    // set X to prevous sibling + designated distance
    if (!node.IsLeftMost())
        node.X = node.GetPreviousSibling().X + 1;
    else
        // if this is the first node in a set, set X to 0
        node.X = 0;
}
Of course, if we actually drew all the nodes at those X values, they would overlap and you wouldn’t be able to see the tree hierarchy.

So we the next step positions the child nodes under their parent.
The Mod Property
Before continuing, I should explain the “Mod” property.
The rest of these steps can involve shifting a Node and all its children over, sometimes multiple times. To do this, we would normally have to loop through all nodes in that subtree and increase their X values, however this can be bad for performance, especially for larger trees.
So to avoid that, we are using the Mod property to tell the node how far it needs to shift all its children by, and then at the end of this this we will do a second walk through the tree to determine the ultimate X position of the node.
To shift a node and all it’s children over during this iteration, increase both it’s X and Mod properties by however much you want.
Positioning Child Nodes under Parents
The next step is to center the child nodes under the parent node. This is actually pretty easy.
First, find the X value that would center a node over it’s children.
- If there is 1 child, the desired X value is the same as the child’s X value.
- If there is more than one child, get the first child’s X and the last child’s X, and find the midway point between the two.
Next, check to see if this is the parent node has any siblings to the left of it. I do this by checking the node’s parent to see if this node is equal to the first node in the parent’s children.
- If this is the first node in the parent’s children, set the X value equal to the desired X value to center the parent over the children.
- If not, assign the Mod value of the node to
node.X - desiredXto shift children under the parent.
After the third tree traversal is done to calculate the final X values of nodes, this will correctly position the children underneath their parent node.
However it doesn’t stop the trees from overlapping each other. See nodes B, C, H, and I in our tree now?

Checking for node Conflicts
Once you’ve come this far, this step isn’t as bad as it sounds.
The basic logic is if a node has any children, we need to loop through all levels of children and ensure that none of the X values assigned to that child conflict with any X values assigned to previously positioned children at the same level.
To do this, we loop through all children of the current node, and for each Y value we record the minimum X position. Then for each sibling to the left of this node, we loop through all its children and record the maximum X position at each Y. Google told me there’s a fancy term for this: the tree Contour.
So at the time that node N (Blue) is being processed, its Left Contour is { 1.5, 1, 0.0 }, while the Right Contour of node E (green) is { 0.5, 1.0, 1.5 }.

Keep in mind that this check uses the final X of the Node as its been calculated so far, and not the local X that we assigned to it initially.
We can see that both the first and second levels overlap, so we need to shift node N over far enough that its Left Contour no longer conflicts with node E’s Right Contour.
In this case, the largest overlapping distance between the two contours is 1.5, and we want to add an extra 1 to make sure the nodes aren’t drawn on top of each other, so we shift node N over by 2.5 places.
Fixing middle trees after resolving a conflict
The previous step fixed the issue of having overlapping nodes, however the end result leaves a lot of empty whitespace in the middle of the tree. Note the position of node F in the tree now:

We shifted node N because it conflicted with E, and now we need to take that distance and apply it evenly across all sibling nodes that are between the two conflicting nodes.
To do that, we divide the distance shifted by the number of nodes between our two conflicting nodes + 1, and shift each of the middle nodes over by this value.
In our case we shifted the node by 2.5, and there is only 1 node (F) between nodes E and N, so we need to shift F over by 2.5 / (1 + 1), which results in 1.25.
And then to be sure we didn’t cause conflicts by shifting the middle nodes, we need to check for conflicts once again.
The end result is the trees will be slightly larger than absolutely necessary, however they will be generated nicely with no conflicting nodes or uneven amounts of whitespace anywhere.
Second Traversal of Tree
Some nodes can have a negative Mod value, which can position the final X of child nodes at a negative value too, and render them off screen.
For an example, if I shift node N to be positioned under A instead of O, I get this result because node H has an X value of -1:

We could check the Mod value at the time it’s calculated to ensure it’s not a negative, however that would only shift our current node over, could resulting in some undesired extra whitespace between sibling nodes.
For example, take a look at the space between nodes G and M in this tree

The best way to fix this problem is to shift the Root Node over enough so that none of the final X values will be negative.
To do this we can get the Right Contour of the Root Node, find the smallest X value, and if its negative we shift the Root Node over by that amount. Remember, to shift a subtree we adjust both the X value and the Mod value by whatever amount we’re shifting by.
Here’s how my code for this looks
private void CheckAllChildrenOnScreen(TreeNode rootNode)
{
    var nodeContour = new Dictionary<int, float>();
    GetLeftContour(rootNode, 0, ref nodeContour);

    float shiftAmount = 0;
    foreach (var y in nodeContour.Keys)
    {
        if (nodeContour[y] + shiftAmount < 0)
            shiftAmount = (nodeContour[y] * -1);
    }

    if (shiftAmount > 0)
    {
        rootNode.X += shiftAmount;
        rootNode.Mod += shiftAmount;
    }
}

private void GetLeftContour(TreeNode node, float modSum, ref Dictionary<int, float> values)
{
    if (!values.ContainsKey(node.Y))
        values.Add(node.Y, node.X + modSum);
    else
        values[node.Y] = Math.Min(values[node.Y], node.X + modSum);

    modSum += node.Mod;
    foreach (var child in node.Children)
    {
        GetLeftContour(child, modSum, ref values);
    }
}
Here’s how the tree looks now after being shifted over to fit all nodes on the screen:

Third and Final Traversal
The third tree traversal calculates the final X position of each node by adding the Mod value of all its parent nodes to its X value.
I use a simple recursive function for this
private void CalculateFinalX(TreeNode node, float modSum)
{
    node.X += modSum;
    modSum += node.Mod;

    foreach (var child in node.Children)
        CalculateFinalPositions(child, modSum);
}
Here’s an image of how the final tree’s X values look

Final X Values
(I have decimal numbers in there because I was by positing nodes 1 space apart to make the math easier to follow, and determining the midpoint often resulted in a decimal)
Final Results
Now all that’s left to do is take this tree of objects with X,Y coordinates, and draw it somewhere!
Final Thoughts
This algorithm is not perfect. I have tested what I could, but I’m sure there’s still bugs in it (I found one while writing this post!). But now I understand how it is supposed to work, and can debug/fix the issues that come up as needed.
The sample code I was using for this project can be downloaded here.
It may not be optimized since it was done for demonstration purposes only, and could be missing some things. It should be thoroughly tested before being used in any kind of production environment.


 Posted by Rachel


 Home
Home Products